Friday, September 28, 2012

Panzanella AKA Bread Salad

Panzanella is a salad of bread and tomatoes. You can add a lot of variations to this to personalize it. I was watching Ina Garten on Food Network this afternoon and when I saw her make a grilled version of this salad, I paused the show and headed to the store to get the necessary ingredients. 

Slice up red and yellow bell peppers, as well as a red onion. Brush with olive oil and grill. (You can totally do this outdoors OR indoors!) While these were grilling, I cut up a tomato into small cubes. Ina's recipe called for a hothouse cucumber and capers, as well. I don't love cucumber so I skipped this, and I  was too impatient to look for the capers. Geez! She also added some chopped basil to this mixture - my grocery store was out of this. 

Flip the vegetables to grill both sides. Once done, add the onions to the tomato/cucumber mixture, and place the bell pepper on a cutting board to cut into smaller pieces. Then add to the salad. After that, slice a baguette on the diagonal and lightly oil - grill up. Once grilled to perfection, add to the salad.

You will top all of this with a homemade vinaigrette. Mix, and serve warm. Yum! 


I think the salad would look 10x better with the specks of green from the basil. But let them assure you that even with some modifications, this salad was delicious!


Mary


Thursday, August 30, 2012

Balls O' Health

Do you buy "sport's bars"?? If so, you might be surprised to see the ridiculous number of ingredients and those that you cannot possible pronounce. I for one cannot in good conscience buy another one. My goal this year is to stay away from all processed food items and what I have learned is that I can make my own, which end up tasting better, and have to certainly be better for us.
The other day I made the mistake with a quick purchase at Costco and look at the rating these two got on my iphone app. Never again!!

You can rate your food too by scanning the bar code, download the "Fooducate" app on your smartphone. You will be surprised as I was at "grade" some of my "go to" purchases got. Needless to say, I won't be buying them any longer.

I follow many food blogs, all that propose healthy eating, and this recipe taken from one, with a few tweaks of my own, has become a favorite for Derek and I, along with the boys and girls polo teams. (Alaina refuses to try it.) My hope is to share some of our favorites and that they become yours too.

Ingredients

•1 cup old-fashioned rolled oats
• 2 Tbsp hulled hemp seeds
• 2 Tbsp flaxseed, cracked
• ¼ cup unsweetened dried cranberries
• ¼ cup semisweet chocolate chips
• Pinch sea salt
• 1 cup all-natural peanut or nut butter, sugar and salt free
• 2 Tbsp brown-rice syrup or honey


Combine oats, hemp seeds, salt, nut butter and syrup or honey.
In food processor, combine cranberries and whole flaxseeds. Run for a bit to chop cranberries and more importantly, crack the flaxseed. I only have whole flax or ground and I want the crunch from the seed, but without breaking it, we cannot utilize it's nutrients.

Combine all ingredients and mix. I use my hands, much easier to incorporate all.


I use a small ice cream scoop to form uniform balls. I throw in ziplock in freezer and pull them as we need. They make great healthful snack, pre or post meal option.


Thursday, June 28, 2012

Tortilla Breakfast Cups

I have seen tortilla breakfast cups featured on different cooking shows and in magazines over the past few months. A couple weeks ago I had a little extra time and thought it was the perfect opportunity to experiment with these little babies. What I really love about them is that you can get really creative with these. I think they would be really fun at a brunch - you could have a whole bunch of fillings prepared and let everyone 'design' their own cups.

Let's get to the making....

My pictures of this process are not very detailed. However, this is very simple to execute. Preheat your oven to 350 degrees. While the oven is heating, grab some tortillas and heat them in the microwave. Warm tortillas are less likely to crack. (We actually whipped up some homemade flour tortillas for this!) Definitely opt for whole wheat hear to get the added benefit of fiber with the more filling whole wheat carbs. Grab a muffin pan and spray with cooking spray. Gently place each tortilla into a muffin cup, and press it ion to form to the cup. 

Now it's time for the fillings. There are two schools of thought here. The first is that you get a bowl, and crack an egg into it. Then scramble the egg - mix your toppings into the scrambled egg and then pour the mix into the formed tortilla. The other school of thought, which is what we did here, is to just fill up the tortilla with your toppings and then crack an egg on top. Top with cheese as desired. Oh and I always season with salt and pepper!

Place in the oven for 15-20 minutes, or until the egg is fully cooked.


 Here's a shot from the inside. This wasn't really a planned making of breakfast cups so I used what I had on hand - pinto beans, cut up (nitrate-free!) turkey slices, and diced onion.

A few topping ideas are bacon, ham or sausage, spinach, tomatoes, bell pepper, corn, mushrooms, etc! Get creative and have fun with this! This is a very customizable recipe, and a fun change from the ordinary.

Mary

Tuesday, June 26, 2012

Oven-Baked Falafels

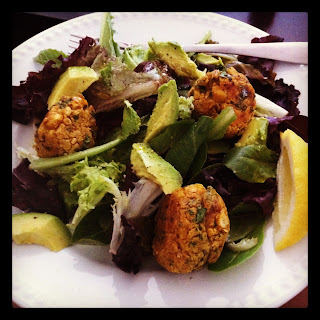
I stumbled across a falafel recipe on the internet last week and was quite intrigued. I've seen fried falafels at restaurants, and while they sounded very good, I wasn't interested in wasting all of my daily calories on one fried meal! That's why I was pleasantly happy to have found this recipe. I made a few adjustments as I was only cooking for one and didn't have everything on hand. Also, I added my baked falafels to a salad rather than a pita. Both options sound delicious!

(I'll give the directions with the original proportions, which is great if you're cooking for your family. If it's just for one, go ahead and halve everything)

Start by preheating your oven to 400 degrees. For the falafels, combine 2 cans of rinsed and drained chickpeas with 3 tablespoons of flour in a food processor. Add 1 teaspoon of chili powder, 2 teaspoons of cumin, 4 cloves of minced garlic, 2 teaspoons coriander, 1/2 teaspoon salt and a dash of black pepper. Feel free to adjust the seasonings here to those that you have on hand and your taste preferences!


You can mix this in batches if you need to. The original recipe called for 3 tablespoons of parsley, but I didn't have any, so I added one of my favorite herbs - cilantro! If you don't have a food processor, mash this all together with a fork or potato masher.

Make small balls from the mixture - 2 inches wide and 1 inch thick. Really, you can make them whatever size you want, though! Just make sure they are all the same size, no matter how big or small, because that will ensure that they cook evenly. Place some foil on a baking sheet and spray with non-stick cooking spray. Place your falafels on the baking sheet and put in the oven for 15-20 minutes, or until golden brown.

 Fresh out of the oven..... the outsides were crisp and the insides were soft. Very nice texture!

From here, add your falafels to whatever meal you want. I made a salad where I added some avocado and dressed with a squeeze of lemon juice, a drizzle of olive oil, and some salt and pepper.

For the original recipe, they made falafel pitas. They were dressed with a mixture of tahini (sesame paste) and lemon juice. Falafels, lettuce, tomatoes and feta were placed in a whole wheat pita and topped with the dressing.

Either way, it's yummy and a much healthier version that the fried ones!

Mary

Monday, June 25, 2012

Low Cal Key Lime Tartlets

Inspired by a recipe in Fitness magazine,  I made some key lime tartlets a couple weeks ago. The best part is that not only are they delicious, but they're only 70 calories each!

You can buy phyllo dough shells that are already made, but my store didn't have those so I just got a pack of phyllo dough. Carefully unwrap the gently thawed phyllo dough. Lay down one sheet as smooth as you can, spray with cooking spray and top with another sheet. Repeat this until you have 6 sheets of the phyllo dough.


Cut the stack into thirds. Once that is done, cut each third into thirds. This will leave you with 9 parts. (Sorry no picture of that part!)


Take a muffin pay and spray with cooking spray. Take one of the nine pieces and gently lay in the muffin cup. Repeat with the others. Smoosh (yes, that's a technical cooking term) the phyllo dough down so you form the tartlet shape.

Place in a preheated oven at 350 degrees, for 10-15 minutes, or until lightly browned.
 Take out of the oven and gently move to a rack for cooling. They came easily out of the muffin cup with the help of a spoon.
 Alright, for the filling. If you love hard work, grab a bunch of little key limes and individually juice them until you have 1/2 cup of lime juice. I actually found the below pictured bottle of Key Lime Juice and opted to go that route instead. Also, I can't find key limes in my neck of the woods right now! Mix with fat free sweetened condensed milk. Usually I don't opt for fat free because they use a lot of chemicals to maintain the right consistency in products, but I was happy to see that was not the case here. Anyways, I found it was much easier to use my kitchen aid to mix the two because it really helped to combine them nicely into a smooth mixture.
 You have to let the key lime/sweetened condensed milk mixture set in the fridge until thickened - with a pudding like consistency. This will take about an hour.  [You're going to need to seriously implement some self control and will power here to not eat the whole mixture out of the bowl with your fingers...or a spoon. It is that good!] When this is ready, place 1 tablespoon into each tartlet shell.
 Mmmm.... looks divine! The recipe should make 24 total.
 I topped each of mine with a small dollop of homemade whipped cream. Delicious!
70 calories each makes for a very light and creamy summertime dessert.

Enjoy!
Mary

Monday, May 7, 2012

Homemade Latte

I love a good (decaf) latte, but I    a) don't want to spend the money necessary to buy them at a coffee place on a regular basis..... b)  want to know exactly what I'm consuming..... c) don't generally have time to go to a coffee shop!

I recently read about a way to make a homemade latte without having a frother attachment, and was so excited! I had an awesome little frother that my mom had gotten me from IKEA, but unfortunately it broke. :( But now there is a solution!

Begin by brewing your favorite coffee - full 'caf', decaf, hazelnut, what ever your cup of tea coffee is! While your coffee is brewing, heat up some milk in the microwave.... I heated for 1 minute, until warmed through. And a latte is generally 1/2-2/3 milk, which means you're using half or less of coffee. But honestly, at moderation4life, we're all about tailoring things to your needs and tastebuds so if you want more or less coffee, do what you want!

Once your milk is warm, either place it in a blender, or grab your handheld egg beater.


 I only used one of my beater attachments, and basically whip/blend until frothy! Can't be easier.

Grab a cup of joe, and sweeten to your liking.

Add your frothy milk to the coffee. You will need to get a spoon to get the froth into the cup, because the froth tends to sit at the back of the cup when you're pouring. Once again, add as much or as little froth and milk as you like.

And guess what, now you get to enjoy!


Make this on your next lazy morning, or as you're headed out the door to your busy day!
Mary

Thursday, May 3, 2012

Lunch from Leftovers

Craving a summer pasta salad? Try this out!

I made a big batch of roasted chicken that I used when making enchiladas. The next day I wanted to find a creative way to use up the leftover chicken. Looking through my fridge, I saw that I had some leftover spaghetti from a previous dinner and half a lemon. Checked the pantry and found a can of cannelini beans and knew I had an awesome lunch idea!

I cut the chicken into small pieces and warmed in a pan with 1 teaspoon of olive oil. I added the drained and rinsed cannelini beans (about 1/2 a can - I was only cooking for one!) until they were warmed through.

Have you ever wilted spinach? It's incredible to see how such an abundance of spinach can wilt down to so little! Anyways, add a bunch of spinach to the pan until it is wilted.

In the meantime, I whisked up a lemon vinaigrette - olive oil, lemon juice, garlic, salt, pepper, a teaspoon of sugar, and some red pepper flakes. I heated the spaghetti leftovers in the microwave and topped it with the combination from the pan, then tossed with the dressing!


Oh my gosh! It was so delicious. The warm cannelini beans added a wonderful creamy quality to the dish, and the wilted spinach was so fresh and yummy! This is a great summer pasta salad to try out.

Enjoy!
Mary


Monday, April 23, 2012

Easy Oven-Baked Fries

Seriously, who doesn't love fries?? I love them even when they're not technically fried. :)
Let's not waste any time with chit chat today - it's time to dive into the fries!

Grab some russet baked potatoes - scrub them clean, cut in half lengthwise, and then cut into thin slices. Adjust the size and thickness based on your own preference.

Take your baking sheet and cover with foil - spray with nonstick baking spray. Place the potato slices on the sheet, drizzle with 1-2 teaspoons of olive oil. Now comes the seasoning - get creative! Seriously, whatever you want! This time I did salt, pepper, garlic powder, paprika and rosemary. You can keep it simple with just salt. You can make them spicy. You can add cajun seasoning, or make garlic fries. Do whatever sounds good to you and your family!

Place in the oven at 400 degrees until browned. This takes 30-40 mintues...move them around on the baking sheet about halfway through the cooking process so that they brown easily.
They'll come out browned and flavorful. Enjoy as a side to your favorite dish!
Mary

Low Calorie Chocolate Chip Muffins

We wanted some more breakfast options for my husband and decided to do some research. He likes muffins, but muffins from the store are often very high in calories and sugar count. Did some searching online and it seemed almost too good to be true when I found a muffin recipethat boasted 263 calories for a jumbo muffin (which equates to 131 calories for a standard muffin - in a 12 hole muffin pan). Guess what, it tasted awesome, too! My husband and I (are a few lucky friends who were over when they came out of the oven) loved them.

No pictures of the baking process, but I'll walk you through it:

Preheat the oven to 400 degress and spray a 6 cup jumbo (or 12 cup standard) muffin tin with cooking spray - or use paper liners.

Combine the following in a large bowl: 1 1/3 cup whole wheat flour, 2/3 cup all-purpose flour, 1 teaspoon baking power, 1/2 teaspoon baking soda, 1 teaspoon salt. In a separate bowl, (I used my kitchenaid) whisk together 1 whole egg plus 1 additional egg white, 1 cup light vanilla yogurt, 2 tablespoons canola oil, 1/2 cup skim milk, 1/3 cup light brown sugar, and 2 teaspoons vanilla.

Add the dry ingredients to the wet until everything is just combined. Fold in 3/4 cup of chocolate chips.

Spoon the batter into the muffin cups, filling them 2/3 full. Bake for 20-25 minutes or until gold brown. Stick a toothpick or a fork in the middle to make sure they're cooked all the way through. Let the muffins cool a bit, remove from the muffin pan and enjoy!

They were so delicious and the vanilla yogurt adds a nice flavor and moistness to the muffin.

Complete nutrition info for 12 standard muffins - Per muffin: 131.5 calories, 2 g fat, 31 g carb, 5g fiber, 4g sugar.

Enjoy these muffins for breakfast, dessert or a snack! I actually made a second batch without chocolate chips that I served with some all-fruit jelly.

Mary

Orange Julius anyone??

I always loved when we would make orange julius' for treats when I was growing up. They're so refreshing and tasty! However, they're not exactly a great option when it comes to calorie/sugar content. When we got our VitaMix, it came with a recipe book that I put on the bookshelf and hadn't really thought of since. I decided to pull it out this morning, and it is absolutely a treasure trove of great recipes! I was so excited to see one called 'Orange Juice Plus'. It tastes just like an orange julius, and the best part is there are only 42 calories per cup!

To make it, place the following ingredients into your blender in the order listed:
2 medium navel oranges - peeled and halved ~ 1/4 cup water ~ 1/4 teaspoon vanilla
1 tablespoon sugar ~ 3/4 cup ice

Turn your blender on and blend for 30 seconds or until desired consistency is reached. It makes 3 cups total - I gave my hubby 2 cups at 84 calories total, and I had 1 cup. It was delicious and refreshing!


Enjoy this warm weather treat guilt-free!
Mary

Tuesday, April 17, 2012

What's for Lunch today??

I was recently referred to the website skinnytaste.com . I want to say outright that I am NOT a supporter of gluten-free/low-carb at all (unless someone has a gluten intolerance/allergy). I do not agree with the Paleo diet. I (and my mom and I are on the same page on this!) think that whole grains are very essential in your diet. Eliminate carbs made from white flour and cut out processed sugars from your diet. If you take bad carbs out of the picture, what you're left with are a source of nutrition that provides a lot of energy for your body. Not to mention the fiber benefits found in whole grains. Anyways! - this website promotes a lot of gluten-free things, because that is the big fad diet right now. So, moral of this long winded paragraph, take the recipes with a grain of salt. And remember, 'good' carbs are good!!!

So the point of bringing up this website, is that I found a recipe for 'Zesty Avocado Cilantro Buttermilk Dressing'. This sounded awesome, and since I was planning on making a big salad for lunch, this seemed like the perfect topping.

The ingredients in this recipe are:
  • 3/4 cup low-fat buttermilk
  • 1 small jalapeno
  • 1/4 cup of fresh cilantro
  • 1 medium haas avocado
  • 1 clove garlic
  • 2 tbsp chopped scallion
  • juice of 1 lime
  • 1/8 tsp cumin
  • 1/4 tsp fresh ground pepper
  • 1/2 tsp kosher salt

And get this, the website provided nutrition info! I love that!
Servings: 6 • Serving Size: 3 1/2 tbsp Calories: 64.9 • Fat: 4.8 g • Protein: 1.8 g • Carb: 5.1 g • Fiber: 2.2 g • Sugar: 1.9 Sodium: 128.8 mg

A side note is that I found this recipe when I had just gotten back from the store, so I didn't have scallions or cilantro (which are actually usually staples for me!). So my version is a smidge different. Let's go!

Did you know that if you don't have buttermilk, you can simply squeeze a lemon into some milk and let it sit for a few minutes? I love this trick. The acid in the lemon makes the milk curdle, and voila! you've got buttermilk. So measure 3/4 cup. (I use 1% milk. The fat found in milk can only be found here and there are benefits to - no need to go fat free, and at the same time, don't overdo it with whole milk).
Take your avocado, split in half and take out the pit. Place in your food processor or blender.
Next, I added in my salt, pepper and cumin. Oh, and two cloves of garlic! The recipe called for one, but I love garlic.
Squeeze the lime juice right in!
Slice the top off of your jalapeno, and then cut it in half. If you are sensitive to heat, cut out the membranes and seeds. Chop into rough pieces, and throw in the food processor.
Place your buttermilk in the food processor. [Add half of the milk to start, if you want your dressing thinner, add more until you reach the desired consistency!] At this point, you would add the cilantro and scallions.

Alright, taste your dressing. Add more seasoning if needed. Add some more of the milk if you want it thinner. Make it perfect for you!

Let's plate it up....
I took a plate and heaped on a bunch of salad. I took a can of tuna and used about half of it. All I did was scatter it around the plate. Then I took some cherry tomatoes, cut them in half and added them to the salad. Finally, use a spoon (remember the nutrition info is based on 3.5 tablespoons per serving!) and place some dressing on your salad. You won't need all of the dressing you made for your one salad!

Now remember, carbs are good. I would serve this with a nice slice of whole grain bread or some whole wheat pita chips!
Want to fancy up your drink to go with your lunch? I got this drink in part from two wonderful women in my life... my mom combines her sparkling water with slices of fruit. And our dear friend Kari T helped me realize that you don't have to reserve your wine glasses for alcoholic beverages. It adds a touch of elegance to any drink! :)Enjoy your eats today!
Mary

Friday, April 6, 2012

Homemade Ribs

I have recently developed a love for ribs. The South is famous for it's BBQ....on every corner there is another BBQ place claiming to be the best bbq in the south! Unfortunately, with my food "issues" (aka not eating preservatives and chemicals and flavor enhancers) these places aren't really an option for me. That left me with only one option - to make it myself! There are a lot of options at BBQ places.... but ribs are definitely my favorite, so let me show you how I make mine.

The most important part of making ribs is having good seasoning. Some people do only a dry rub, some people do only sauce, and some people do a combo. I change it up between dry rub only and a combo. But let's get to the dry rub and go from there....

This is the base for flavor in your ribs, so go BOLD! I have to apologize here because I have never measured the dry rub when I make it. Part of what I love about cooking is that you don't have to be exact. You can throw a little of this in, and a little more of that, and get it to the perfect flavor palette for you. My rub includes a combo of salt and pepper (of course!), paprika (that's the big red pile), a little cayenne powder (the small red), garlic powder and onion powder. I combine all of that together...
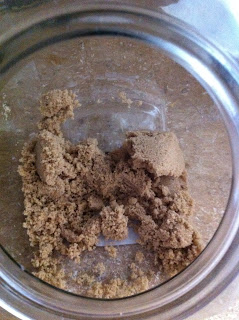
and get some brown sugar! The brown sugar is what will help the outside of the ribs to carmelize as it cooks. I just mix the spice rub in with about 1-2 cups of brown sugar. Remember though, it's flexible - so don't get too worked up about it. Add some, think you need more? Add a little more!
This foil process was perfected by my mom, and it works really well! Lay down one piece of foil on the counter, and get another piece ready to lay on top of the ribs once you rub the spice/sugar mix on.
Lay the ribs meaty side down on the foil. Speaking of the ribs, I usually buy pork loin ribs because they're tasty....and they're cheap! I can get them for about $1.91/lb. Baby back ribs are delicious, but they are usually closer to $4+/lb. Anyways, spoon some of the spice mix over the top and rub it in - it's not called a dry rub for nothing.... get rubbing!
Then flip it over. This is the side where I reserve most of the rub for....because it is where most of the meat is, and we want to give it a lot of yummy flavor.
Now, wash your hands! Then, lay the top piece of foil over the bottom. I'm sorry that I don't have any good pictures of this process. But you will push the two pieces together, and then roll the bottom piece over the top until you run out of room (because you're up against the rib) and fold down. Make sure it is well-sealed! If it's not, you will have the rib juices dripping out.
Line a baking sheet with foil, and place your foil wrapped ribs on top. Place in the oven at 300 degrees for 3-4 hours. For the last 15-30 minutes, I unwrap the foil (just the top piece) and place a little more brown sugar over the top to carmelize. This is also the point where I would rub on some barbeque sauce (by the way, Trader Joe's has an awesome and natural sauce!). I would put the sauce and then sprinkle a little brown sugar over.
You know the ribs are ready when they are fork tender. Basically, take a fork and try and "fork off" a piece of the ribs that are near you. It should pull off easily.

And this is what they'll look like what they're done. This was a set of ribs we made for a party we had - 5 racks of ribs....my idea of a party! :)
Hope I've taken some of the fear factor out of ribs for you! I used to be pretty intimidated by them, but they are so easy. The prep part takes 10-15 minutes, and then you let them go for a few hours! They end up so tasty. We serve them with mashed potatoes or homemade fries....salad, corn....whatever you feel like!

Mary