After almost 25 years as a fitness professional, and as someone who struggled with anorexia in high school, I know firsthand how difficult it is to fix a metabolism that was screwed up from yoyo dieting. I have been a regular exerciser for 25 years now and have had a handle on eating nutritionally now for 20. As I have discussed in past, it is about balancing calories you eat with the calories your body uses each day. Not brain surgery by the way. But what has come to my attention in the last few weeks, just by really paying attention to how and why people choose to put certain things in their mouths, it is never about what "I should eat", it is always about "what i want to eat", for most of us. This is what has to change. If you desire to lose weight and feel better, and maintain that mentality, you must make the decision to eat for your health, especially given that the majority of diseases that will kill us stem from unhealthy eating and exercising habits. Things that we must choose to control. I for one plan to do everything I can to avoid dying, or worse yet, being incapacitated from having a stroke, heart disease, cancer, diabetes, colorectal cancer and the like. Most of these are self imposed illnesses, though some will get us no matter what we do to avoid them. In my "no regrets" mentality, as long as I KNOW that I have done what I can to give my body the best chance of avoiding these killers, than I can have no regrets along the way. Same reason I choose not to partake in unhealthy endeavors like motorcycle riding, riding a bike without a helmet, or being in a car without a seatbelt.
So, you wonder, where the hell do I start? The answer is easy. A food diary. Yes, you must take responsibility for what you put in your mouth, the good, the bad and the ugly. And it starts with writing down everything you eat, each and every day, until you finally "get it". This is what I require of all my clients and I will remind you once again, that most never have the opportunity to work with me because they refuse or are unable to commit to the food diary. And just to continue to practice what I preach, earlier this year I committed to my own food diary for a month, writing down everything I put in my mouth and counting every calorie. The modifications I had to make during this time, which is what I expect of my clients in the beginning, is to "keep it simple stupid" and eat basic, clean food that is easy to measure and calculate calories with. That means unless you are willing to do the work associated with making a complex meal and figuring out the accompanying calories, you keep it basic....chicken, steamed veggies, brown rice type of meals.
Just like with any addiction, most of us have an addiction to eating "yummy" tasting food, which happens to be high in fat and full of empty calories, we must eliminate these foods from our diet. PERIOD. You cannot have your cake and eat it too, otherwise you will want that cake every day. While you are in the "losing" mode, most people must completely eliminate the problem rather than try to have a smaller amount of it every day. Be it chocolate, alcohol, or heroin, you have to abstain from your drug of choice, in total. Interesting to think about drug addicts or alcoholics, don't get the privilege of ever partaking in these goodies ever again. But with food, unless you have an allergic reaction that can kill you from eating it, you can make the decision to eat "it" in the future, and while that bite won't kill you directly, it could ultimately kill you indirectly because of your self-imposed addition to unhealthy food items.
So, what is your plan. As you approach the new year and the chance to use a "new year's resolution" as you excuse to finally make that change, are you in? Step one in the process is just to write down every morsel you put in your mouth, along with approximate amounts. Step two, with the help of an inexpensive food scale, which you can buy for $19.99 at Costco right now, is to begin to calculate every calorie you put in your mouth. Step three is to start to modify what you eat with healthier options. I.E, if you eat a bagel with cream cheese for breakfast each day, you change it to a high fiber option, and lite cream cheese. That coffee latte, with whole milk and whip cream, easily changes to low fat and no whip. Simple changes add up to lifestyle changes that will improve yours.
Friday, December 30, 2011
Wednesday, December 14, 2011
Eating Healthy on Vacation
This past weekend I had the privilege of traveling to northern South Carolina where Alaina was competing for running. My mom and her made the trip from CA and we were able to stay at a Marriott hotel set up like a timeshare. We love staying at a place with a kitchen because it really makes eating healthy on vacation very realistic.
Even outside of the hotel, my mom and I were able to eat healthy. Subway is always a good option when traveling, so we went there for lunch one day. Make sure not to load up on the dressings, cheeses, or unhealthy meats. Chicken, turkey, tuna, or veggie are great options. Then, when Alaina's team went to get ice cream, we found a TCBY frozen yogurt for our healthier treat option.
Back to the hotel, we decided to make an awesome dinner, versus going out to eat. Let's get started...
Grab some sweet potatoes, scrub them up and get cutting. Cut the sweet potatoes in half.
 Try to cut each half in half again, so you have two thin long flats. Then cut slices in each flat piece.
 Now all of the slices go on to a foil lined baking pan.
Drizzle the sweet potatoes with a little bit of olive oil, and season with salt and pepper. Get your hands in there and get mixing!

Set the sweet potatoes aside for now, and let's start on some cilantro pesto for the shrimp we're making. Chop up a whole bunch of cilantro, and finely mince some pecans.
 Then chop up some green onions...love the flavor of these...
 Throw your greens into a blender or food processor.
 Add in the nuts.
 Drizzle some olive oil into the blender. This amount really will vary because you need just enough oil to be able to puree the other ingredients. We used garlic infused olive oil for this. If you have regular olive oil, then also add a few mined garlic cloves. Next, use your microzester to add some lime zest to the mixture. Then cut your lime and squeeze some juice in!
 Time to mix it up! Nice and blended. Add a little more oil if it needs it - you be the judge here!
 Alright, moving onto the shrimp. Grab your bag of frozen shrimp and place in a colander. To quickly thaw run cool water over the shrimp. Make sure not to use hot water, it can be a safety risk!
Okay shrimp are ready to go, onto the broccolini. Rinse and chop off the ends.
 Place in a pan with a little bit of water, add a lid, and steam the veggie.
Remember those sweet potatoes we prepared? Get them in the oven. 425 for 30-40 minutes, you want them crispy and lightly browned! (We did end up moving ours onto two sheet pans so it wasn't so crowded).
 In the meantime, grab yourself a nice cold beer! We choose a hefeweizen, and added some orange slices to compliment the flavors of the beer.
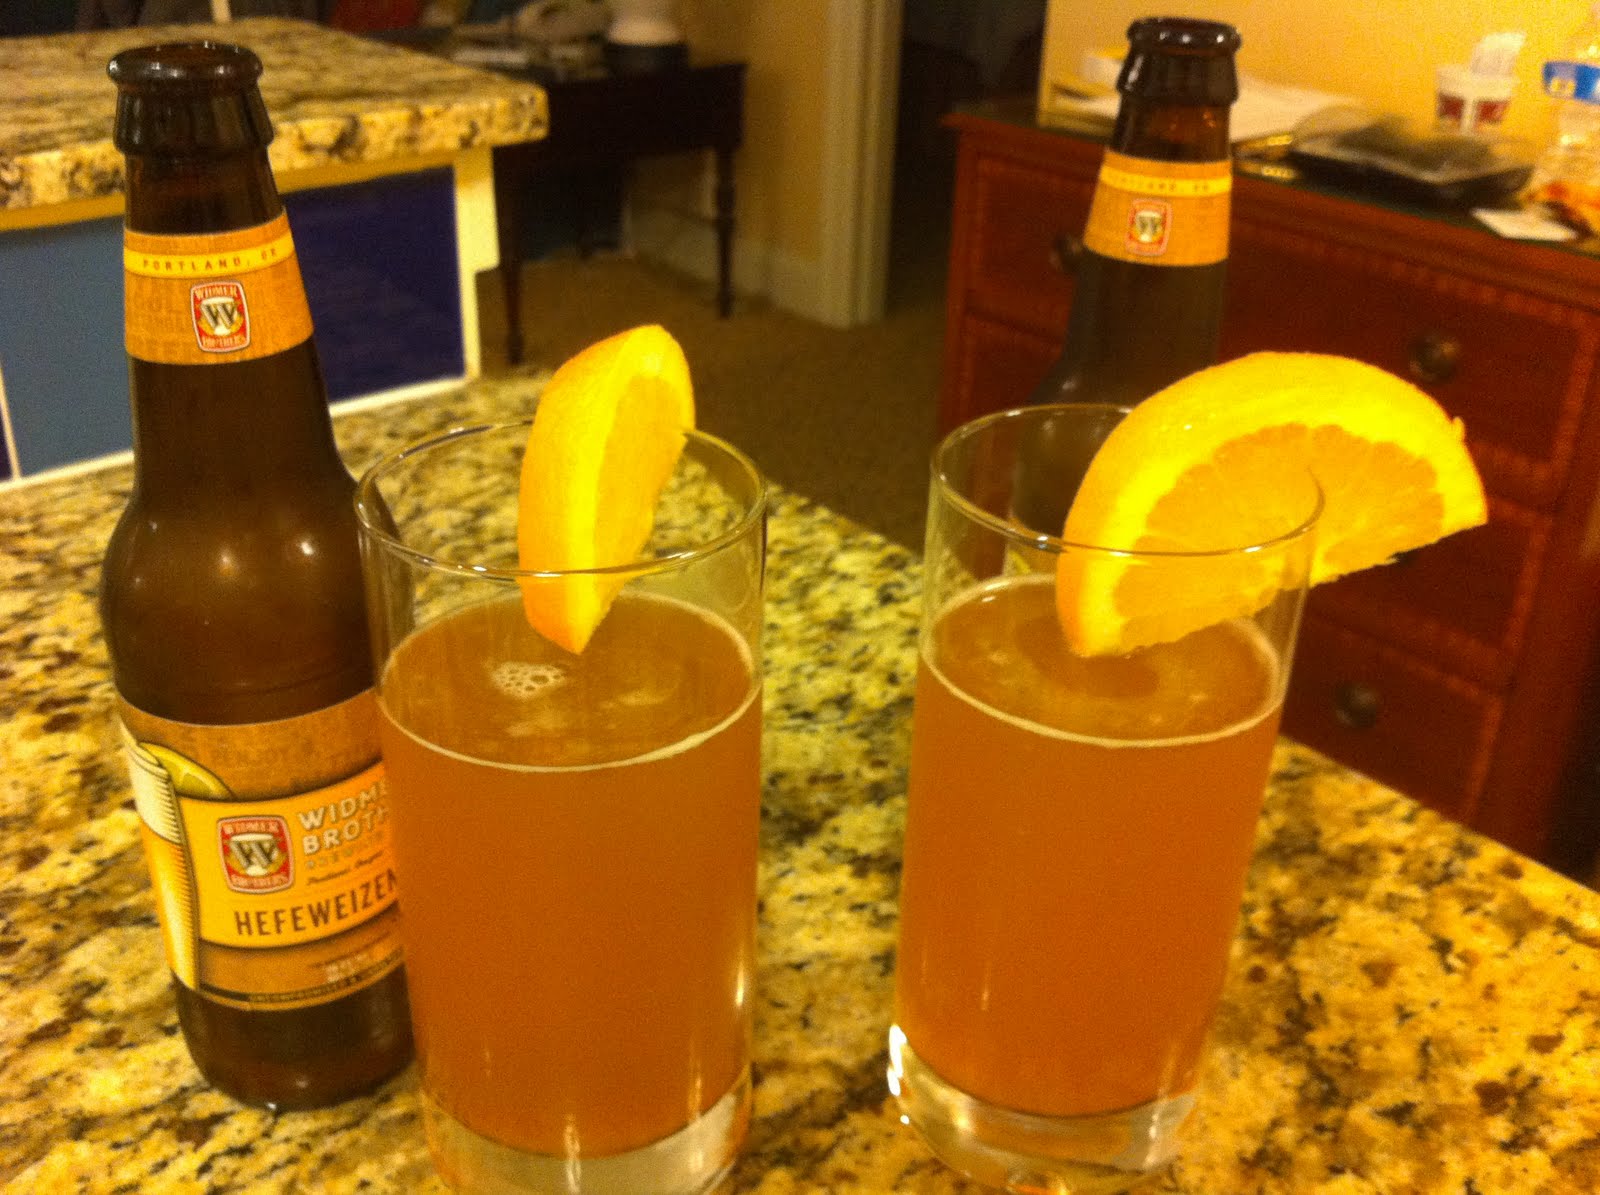 Let's get the shrimp in the pan. Add the shrimp to the pan, and just pour the pesto right on top! These babies will cook quickly, like 1-2 minutes per side, so keep an eye on them.
 Once the broccolini have steamed, add a little of the garlic infused oil (or olive oil and garlic) with salt and pepper and let's saute these.
 Voila! A fabulous meal on vacation with just a little bit of effort.
 Here's our sweet potato fries - they were AWESOME! Try these for your family this week!
Here we are, at the end of our cooking, very excited for our meal!
 Vacation doesn't have to mean bad eating! You can still find ways to meet your healthy lifestyle goals, no matter where you are.
Mary
Tuesday, December 13, 2011
Moderation applies to more than just your diet...
While the catch phrase on top of the website page is 'Do you have time to eat that?', the actual website name is 'Moderation For Life'. This is such an important concept that Americans seem to have a really hard time grasping. Our culture is very much based on quantity and excess....with the mentality that the more you have, the better! While there are some things that this is true for - like love :), can't ever have enough of that! - this is not great when it comes to food. Almost all of our blog posts up to this point have discussed this topic.... that moderation is the key with your diet. You don't have to completely eliminate sweets and your favorite foods from your diet, but it certainly needs to be portion controlled and not done with every meal. But with a little moderation, you can still enjoy your favorite treats. My mom's rule is 80% of the time you eat a balanced diet, with lots of veggies, fruits and whole grains... and the other 20% of the time you can splurge a little!
However, this is a topic that we have discussed a ton on our blog, so I'm going to shift gears a little bit. Let me let all of you in on a little secret....Moderation does not only apply to your diet! Your exercise routine needs moderation, too!
If someone were to only strength train, they would be unbalanced. Similarly, cardio alone is not the answer. And while a workout routine with a mix of cardio and strength training is great, you can apply moderation even more to this. By that I mean that your cardio routine should not consist of only running. Your muscles respond most to a variety of activities. That means that for strength training you alternate training the upper body, your back, legs, abdomen, etc. For cardio, you can switch it up from running, to stairs, to high intensity workouts, to plyometrics, etc.
Really the combinations are endless, and your body will respond much better than it would to a one-note workout routine. My mom does a great job of alternating her workouts (and has been doing so for years, she's one smart lady!) - stairs one day, then running, then circuit strength training, then CrossFit. She's always up for a new workout.
I get bored if a do a given workout too many times, so I'm always on the lookout for a new workout. I've done P90X, CrossFit, NikeTraining (which is a free iPhone app), plus biking, stairs, and running. Lately I've been very interested in the Tone It Up workout plan. It's two girls who have founded this company that has a nutrition plan you can pay for, as well as workouts that you can obtain for free from their blog and on youtube. I'm going to share a few links below that I particularly enjoy!
Shredmill great challenging workout! Mostly cardio will a few extra moves thrown in
Itty Bitty Bikini tough abdominal routine, you will feel the burn here!
Bum Workout tone up that booty!
HIIT high-intensity interval training - a great cardio routine that keeps you guessing. The changes throughout help the time to fly by!
If you have any workout routines you particularly enjoy, please share them! We're always looking for another fun and challenging way to stay in shape :)
Make sure to check in tomorrow for a blog post on eating healthy while on vacation!
Mary
Friday, December 9, 2011
Taquitos At Home
There is a mexican restaurant in my hometown called Pedro's. The food can't be beat. Everytime that Travis and I go, we get the bean and cheese burrito and taquitos. The food is delicious, but not exactly nutritious. My cousin and fellow blogger David, enjoys recreating his favorite meals from out in the world in his own kitchen. I like to take my own spin on this approach, by making meals in my kitchen that I wouldn't eat out in the real world (either due to the fat content or ingredients that are unsafe for me). This is where the taquitos come in. I was motivated to find a way to make them healthier than the deep fried restaurant style, and less chemically-laden than the frozen restaurant aisle taquitos my husband has been eyeing lately.
Let's get started....
Grab some corn tortillas. Corn is a better option healthwise than flour. Before you get started, preheat your oven to 375.
 I made carnitas over the weekend, and had a bunch of leftovers. I posted the carnitas recipe on 9/16. Decided to kick up the seasoning a little bit for the taquitos and mixed the leftover shredded meat with chili powder, garlic powder, and a little bit of salt and pepper.

 This next step is very important. You need to heat up your tortillas. This helps to prevent them from cracking when you roll the taquitos. We don't have a microwave (yet! haha) so I dry heated mine on the stove top. Just heated up a skillet and warmed the tortillas there, no oil, no pam.

Grab your favorite baking sheet and line with foil. Spray the foil with nonstick spray. Set your warm tortilla on there. (If you warm several at a time in the microwave, just keep them stacked under a dish towel and they'll stay nice and warm). Place your carnitas in a line down the center of the tortilla. Roll it up into a cigar shape.
After you do one, the process becomes quite easy. Get rolling! Dampen a paper towel, and lay this over the rolled taquitos as you prepare the rest. This will keep them moist and prevent the cracking.

All rolled up and ready to head into the oven. Bake in the oven until crispy....14 to 16 minutes. After they are done, I recommend spraying a little bit of Pam on top of the crisped taquitos, and sticking them back in the oven on a low broil setting. This will help them to get nicely browned and extra crispy.
I was feeling a little bit impatient, so I put a teaspoon of oil into a pan and browned them this way. Not a bad option, but not quite as healthy as spraying with Pam to brown.

Yum, yum, yum. Crispy, crunchy, golden brown, and free of junk!
Knowing that these taquitos are WAY healthier than normal store bought or restaurant bought ones, I accommodated my cheese loving husband by spreading some grated cheese on top of the taquitos, and sticking them in the oven under broil. This just helps to melt the cheese quickly.
Keep an eye on this, the cheese melts quickly and you don't want to burn your taquitos after all of this hard work!

Here is my hubby's plate....
Here is my plate.... I added some homemade salsa, with sour cream on the side. So delicious. I was really pleased with how crisp the taquitos turned out.
 The best part is that they received Travis's approval - success!
Go make these for your family :)
Mary
Let's get started....
Grab some corn tortillas. Corn is a better option healthwise than flour. Before you get started, preheat your oven to 375.
 I made carnitas over the weekend, and had a bunch of leftovers. I posted the carnitas recipe on 9/16. Decided to kick up the seasoning a little bit for the taquitos and mixed the leftover shredded meat with chili powder, garlic powder, and a little bit of salt and pepper.
 This next step is very important. You need to heat up your tortillas. This helps to prevent them from cracking when you roll the taquitos. We don't have a microwave (yet! haha) so I dry heated mine on the stove top. Just heated up a skillet and warmed the tortillas there, no oil, no pam.
Grab your favorite baking sheet and line with foil. Spray the foil with nonstick spray. Set your warm tortilla on there. (If you warm several at a time in the microwave, just keep them stacked under a dish towel and they'll stay nice and warm). Place your carnitas in a line down the center of the tortilla. Roll it up into a cigar shape.

After you do one, the process becomes quite easy. Get rolling!
 Dampen a paper towel, and lay this over the rolled taquitos as you prepare the rest. This will keep them moist and prevent the cracking.
All rolled up and ready to head into the oven. Bake in the oven until crispy....14 to 16 minutes. After they are done, I recommend spraying a little bit of Pam on top of the crisped taquitos, and sticking them back in the oven on a low broil setting. This will help them to get nicely browned and extra crispy.

I was feeling a little bit impatient, so I put a teaspoon of oil into a pan and browned them this way. Not a bad option, but not quite as healthy as spraying with Pam to brown.

Yum, yum, yum. Crispy, crunchy, golden brown, and free of junk!

Knowing that these taquitos are WAY healthier than normal store bought or restaurant bought ones, I accommodated my cheese loving husband by spreading some grated cheese on top of the taquitos, and sticking them in the oven under broil. This just helps to melt the cheese quickly.

Keep an eye on this, the cheese melts quickly and you don't want to burn your taquitos after all of this hard work!

Here is my hubby's plate....

Here is my plate.... I added some homemade salsa, with sour cream on the side. So delicious. I was really pleased with how crisp the taquitos turned out.
 The best part is that they received Travis's approval - success!
Go make these for your family :)
Mary
Tuesday, December 6, 2011
Easy Veggie Side
I'm always looking for easy ways to cook up veggies....especially now that my sweet husband is NOT a veggie lover. I'd even venture to say that he hates veggies. However, since I have two degrees in health related fields, there is no way that I'm giving up without a fight. I offer to make whatever veggie he is willing to eat, and do my best to come up with creative ways to cook them. The first time I made zucchini for him, it didn't wow him. I thought it was great - zucchini cooked in a little olive oil, seasoned with salt, pepper and garlic powder. Yum!
To me, basically any veggie is good with olive oil, salt and pepper. But for my picky husband, I had to work a little bit harder. I turned my search to the internet to help with my quest and found a Cooking Light recipe for Zucchini Oven Chips.
Let's get started....
Here are the ingredients: grated parmesan cheese, bread crumbs, 1% milk, garlic powder, salt, pepper, pam, and of course a zucchini!

Begin by washing and cutting your zucchini up. Lop off the top and bottom.

Slice your zucchini into 1/4" slices.

Next, mix up 1/4 cup of the breadcrumbs, with 1/4 cup of the parmesan. Then add in 1 teaspoon each of salt, garlic powder and ground pepper. Mix it all together with a fork or a whisk.

Put a few tablespoons into a shallow bowl. To begin the process, dunk the zucchini slices into the milk....

....and then move them to the breading mixture and dredge in it.

Get out your ovenproof wire rack and give it a generous spray with the Pam - then set that on top of a baking sheet. Place the dredged zucchini on top of the wire rack. Make sure to give them a little space. The reason we use the wire rack here is to help facilitate air circulation on both sides of the zucchini....this gets that extra crispy factor that makes them so yummy!

Here they are, ready to go in the oven. Place them in your 425 degree preheated oven. Bake for 30 minutes or until lightly browned and crispy. Have fun tasting them as they get close to being ready!

Take them out of the oven and enjoy the fruits of your labor!

The verdict was good....he liked them and said he'd eat them if (WHEN!) I make them again.
Success!
Go try these out on your picky eaters :)
Mary
Monday, December 5, 2011
A Day in the Life inside Derek's school lunch....

Take care to realize that Derek is an athlete, so he will consume these calories throughout the school day, and it needs to get him through his afternoon practice. Most of us cannot eat this amount of calories. And calories do count. The more you consume over what your body can tolerate, will be stored as body fat.
Sunday, December 4, 2011
Let the competition begin....
Bloggers note: To grill veggies, I use non-stick grill pan and olive oil spray on both sides of veggies, s and p. I will put a heavy pot to help expedite the cooking process as well placed right on top of veggies for a few minutes.
Okay, Mary writes awesome post, so now I feel challenged to do the same. Easy peasy homemade healthy pizza, here we come....
Time intensive, but super easy. You need the afternoon to have the tv or radio on nearby and just the time to grill away on your non-stick grill pan.
I love eggplant, zucchini, baby broccoi(which I steam), red onions, red pepper (which I put right over a flame on the burner then once charred, I throw in the paper lunch bag and when cool, rub off the charred skin) and the tomatoes ( if I have fresh, cut if large, leave if babies, then drizzle with a bit of EVOO, s and p, and roast in hot oven til browned and soft, or I use sun dried tomatoes, in bag from TJs, not oil packed). Next comes the homemade dough, or packaged, TJs has a few kinds to choose from, I always go with the version that is higher in fiber, though this is not WHOLE WHEAT which I would prefer. And your favorite cheese, I like the mildness of mozzarella, I am not a cheese lover, so I use very little, surprise, surprise.
  Next comes your favorite healthy sauce option. I usually make my own in big batches and love Giada's recipe which is chocked full of veggies which no one knows about because I puree my sauce.
  So before you start anything, get that dough out of bag and cut into 4 portions. This is the perfect personal pan pizza size for most people. Calories on dough is 240 calories.
Ingredients:
dough
sauce
grilled veggies or whatever toppings you like
cheese
chopped fresh arugula or spinach
Plan:
Heat over to 450/500 degrees. Heat pizza stone if you have.
Portion dough, roll into balls, and cover with dishcloth on counter
Make sauce
Grill veggies, ready all toppings
Roll dough to desired thickness, I like mine on the thin side, the more space to put my toppings
Place on pizze peel if you have,using a bit of corn meal to allow dough to roll off peel. Or place lightly on cookie sheet with corn meal or nonstick foil
(Inexpensive at Smart and Final, or sets available at Bed Bath and Beyond.)
Top with sauce, cheese (I use a little sprinkle at this point), mounds of veggies, a bit more cheese, then into the oven.
My little guys cook for about 8-10 minutes at this hot temp.
I love to top mine off with red pepper flakes, and a sprinkle of kosher salt, then mounds of arugula or spinach. My pizza, veggies are FREE, are less than 350 calories. Mark and the kids, with tons of cheese and meat, can't vouch for them!!

Okay, Mary writes awesome post, so now I feel challenged to do the same. Easy peasy homemade healthy pizza, here we come....
Time intensive, but super easy. You need the afternoon to have the tv or radio on nearby and just the time to grill away on your non-stick grill pan.
I love eggplant, zucchini, baby broccoi(which I steam), red onions, red pepper (which I put right over a flame on the burner then once charred, I throw in the paper lunch bag and when cool, rub off the charred skin)


Ingredients:
dough
sauce
grilled veggies or whatever toppings you like
cheese
chopped fresh arugula or spinach
Plan:
Heat over to 450/500 degrees. Heat pizza stone if you have.
Portion dough, roll into balls, and cover with dishcloth on counter
Make sauce
Grill veggies, ready all toppings
Roll dough to desired thickness, I like mine on the thin side, the more space to put my toppings
Place on pizze peel if you have,using a bit of corn meal to allow dough to roll off peel. Or place lightly on cookie sheet with corn meal or nonstick foil
(Inexpensive at Smart and Final, or sets available at Bed Bath and Beyond.)
Top with sauce, cheese (I use a little sprinkle at this point), mounds of veggies, a bit more cheese, then into the oven.
My little guys cook for about 8-10 minutes at this hot temp.
I love to top mine off with red pepper flakes, and a sprinkle of kosher salt, then mounds of arugula or spinach. My pizza, veggies are FREE, are less than 350 calories. Mark and the kids, with tons of cheese and meat, can't vouch for them!!

Saturday, December 3, 2011
Ravioli...easy as 1, 2, 3!
The past few months have been crazy...so I must begin by apologizing for not posting! I have a plethora of food pictures that I've taken, so I'll be sure to get those up. Decided I needed to come back with a bang, so first up I bring you: homemade ravioli!
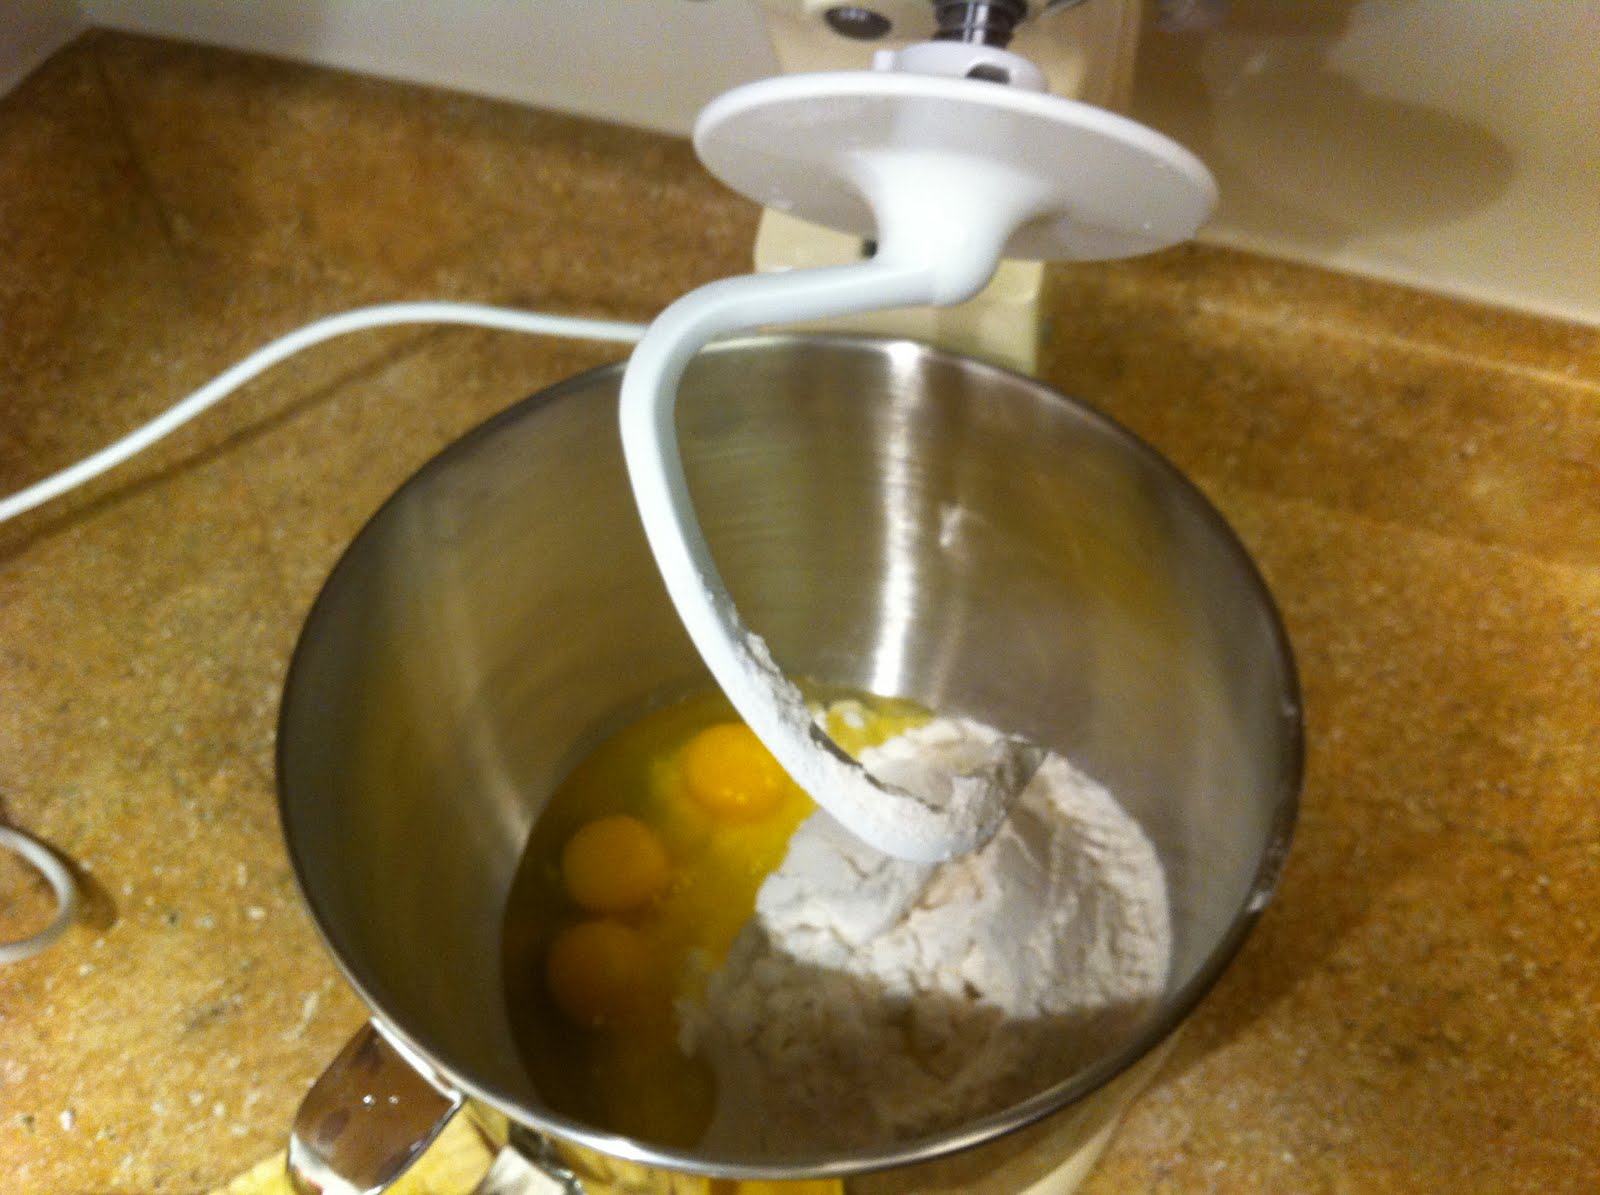
Place 3 cups of all purpose flour, and 3 eggs into a kitchen aid with a dough attachment. [If you're feeling particularly motivated, you can mix the dough by hand. You make a well in the flour and place the eggs and olive oil in it, then start mixing!]
 Add a half teaspoon of salt...
 And 3 tsp of olive oil (that equals 1 TB!)
 Next, add 1 cup of water. Once you start adding the water, the dough will start to form into a ball!
 Place a whole bunch of flour on the (clean!) counter, and place your dough ball on the counter. Start kneading! Basically you punch the dough, gather, flip, punch. Keep going. Don't overknead...you'll get a sense of when it's pretty well formed.
 Lightly coat the dough ball with olive oil, and wrap in plastic wrap. Let your dough rest for 30 minutes. Take this opportunity to pour yourself a glass of wine! :)
 How relaxed and rested does my dough look??
 Grab your rolling pin and roll that sucker out. Try to get a general rectangular shape. Now I really felt that I couldn't get the dough as thin as it needed to be for ravioli on my own with the rolling pin. But I don't have a pasta roller quite yet, so this had to do. If you have one, whip it out now and get rolling! (Initially roll with rolling pin, then put through pasta roller).
 Once your dough is ready, work on your filling. We chose to do a ricotta/parmesan mixture with sausage. You could also do sweet potato or pumpkin filling if you're feeling seasonal...yum! So now I'm heating up my sausage...(place a little bit of water in a pan with the sausage,then put the lid on. Once the water is all gone, the sausage is ready! Let it brown up a little bit).
 For the cheese part of the filling, I mixed ricotta, parmesan, pepper, a little salt, and oregano. You could do thin individual strips of the dough, but I chose to make it a little bit wider so I could simply fold over the dough.
Place a dollop of the cheese mixture, and top with a little of the cut-up sausage. Place each spoonful about a 1/2 inch a part. Not too close to the edge.
 Fold the dough over. Use your fingers to define the area around each filling a little bit.
 Grab your handy dandy ravioli cutter that you just got from William-Sonoma! If you don't have one, don't fret...you can grab one for about $12 or get creative. Use a pastry cutter or small cooke cutter.
 Cut your ravioli out! Hold the ravioli cutter over each area of filling.
Get a bunch of them made. In the meantime, you need to boil some water. Make sure that you salt it very well! Salted water = flavorful pasta.

Place your prepared ravioli into the boiling water. Make sure that all of your ravioli edges are sealed tightly so your filling doesn't come out while it's cooking! Be careful not to get burnt when you drop the pasta in - gently!

Boil, boil, boil! It takes 3-5 minutes to cook. You'll know when it's ready because your ravioli will rise to the surface of the water.

Remove cooked ravioli from water with a slotted spoon so that you don't get a watery bowl of homemade ravioli. We topped ours with a drizzle of olive oil, salt and cracked pepper. You could also do a marinara sauce, or a sage butter sauce. Have fun and make it work for your tastebuds!
 Super easy to do...and a really fun thing to do with someone you love!
 Get cooking -
Mary
Subscribe to:
Posts (Atom)