Thursday, June 28, 2012

Tortilla Breakfast Cups

I have seen tortilla breakfast cups featured on different cooking shows and in magazines over the past few months. A couple weeks ago I had a little extra time and thought it was the perfect opportunity to experiment with these little babies. What I really love about them is that you can get really creative with these. I think they would be really fun at a brunch - you could have a whole bunch of fillings prepared and let everyone 'design' their own cups.

Let's get to the making....

My pictures of this process are not very detailed. However, this is very simple to execute. Preheat your oven to 350 degrees. While the oven is heating, grab some tortillas and heat them in the microwave. Warm tortillas are less likely to crack. (We actually whipped up some homemade flour tortillas for this!) Definitely opt for whole wheat hear to get the added benefit of fiber with the more filling whole wheat carbs. Grab a muffin pan and spray with cooking spray. Gently place each tortilla into a muffin cup, and press it ion to form to the cup. 

Now it's time for the fillings. There are two schools of thought here. The first is that you get a bowl, and crack an egg into it. Then scramble the egg - mix your toppings into the scrambled egg and then pour the mix into the formed tortilla. The other school of thought, which is what we did here, is to just fill up the tortilla with your toppings and then crack an egg on top. Top with cheese as desired. Oh and I always season with salt and pepper!

Place in the oven for 15-20 minutes, or until the egg is fully cooked.


 Here's a shot from the inside. This wasn't really a planned making of breakfast cups so I used what I had on hand - pinto beans, cut up (nitrate-free!) turkey slices, and diced onion.

A few topping ideas are bacon, ham or sausage, spinach, tomatoes, bell pepper, corn, mushrooms, etc! Get creative and have fun with this! This is a very customizable recipe, and a fun change from the ordinary.

Mary

Tuesday, June 26, 2012

Oven-Baked Falafels

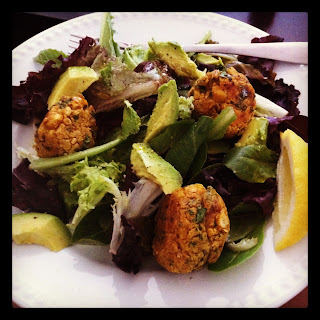
I stumbled across a falafel recipe on the internet last week and was quite intrigued. I've seen fried falafels at restaurants, and while they sounded very good, I wasn't interested in wasting all of my daily calories on one fried meal! That's why I was pleasantly happy to have found this recipe. I made a few adjustments as I was only cooking for one and didn't have everything on hand. Also, I added my baked falafels to a salad rather than a pita. Both options sound delicious!

(I'll give the directions with the original proportions, which is great if you're cooking for your family. If it's just for one, go ahead and halve everything)

Start by preheating your oven to 400 degrees. For the falafels, combine 2 cans of rinsed and drained chickpeas with 3 tablespoons of flour in a food processor. Add 1 teaspoon of chili powder, 2 teaspoons of cumin, 4 cloves of minced garlic, 2 teaspoons coriander, 1/2 teaspoon salt and a dash of black pepper. Feel free to adjust the seasonings here to those that you have on hand and your taste preferences!


You can mix this in batches if you need to. The original recipe called for 3 tablespoons of parsley, but I didn't have any, so I added one of my favorite herbs - cilantro! If you don't have a food processor, mash this all together with a fork or potato masher.

Make small balls from the mixture - 2 inches wide and 1 inch thick. Really, you can make them whatever size you want, though! Just make sure they are all the same size, no matter how big or small, because that will ensure that they cook evenly. Place some foil on a baking sheet and spray with non-stick cooking spray. Place your falafels on the baking sheet and put in the oven for 15-20 minutes, or until golden brown.

 Fresh out of the oven..... the outsides were crisp and the insides were soft. Very nice texture!

From here, add your falafels to whatever meal you want. I made a salad where I added some avocado and dressed with a squeeze of lemon juice, a drizzle of olive oil, and some salt and pepper.

For the original recipe, they made falafel pitas. They were dressed with a mixture of tahini (sesame paste) and lemon juice. Falafels, lettuce, tomatoes and feta were placed in a whole wheat pita and topped with the dressing.

Either way, it's yummy and a much healthier version that the fried ones!

Mary

Monday, June 25, 2012

Low Cal Key Lime Tartlets

Inspired by a recipe in Fitness magazine,  I made some key lime tartlets a couple weeks ago. The best part is that not only are they delicious, but they're only 70 calories each!

You can buy phyllo dough shells that are already made, but my store didn't have those so I just got a pack of phyllo dough. Carefully unwrap the gently thawed phyllo dough. Lay down one sheet as smooth as you can, spray with cooking spray and top with another sheet. Repeat this until you have 6 sheets of the phyllo dough.


Cut the stack into thirds. Once that is done, cut each third into thirds. This will leave you with 9 parts. (Sorry no picture of that part!)


Take a muffin pay and spray with cooking spray. Take one of the nine pieces and gently lay in the muffin cup. Repeat with the others. Smoosh (yes, that's a technical cooking term) the phyllo dough down so you form the tartlet shape.

Place in a preheated oven at 350 degrees, for 10-15 minutes, or until lightly browned.
 Take out of the oven and gently move to a rack for cooling. They came easily out of the muffin cup with the help of a spoon.
 Alright, for the filling. If you love hard work, grab a bunch of little key limes and individually juice them until you have 1/2 cup of lime juice. I actually found the below pictured bottle of Key Lime Juice and opted to go that route instead. Also, I can't find key limes in my neck of the woods right now! Mix with fat free sweetened condensed milk. Usually I don't opt for fat free because they use a lot of chemicals to maintain the right consistency in products, but I was happy to see that was not the case here. Anyways, I found it was much easier to use my kitchen aid to mix the two because it really helped to combine them nicely into a smooth mixture.
 You have to let the key lime/sweetened condensed milk mixture set in the fridge until thickened - with a pudding like consistency. This will take about an hour.  [You're going to need to seriously implement some self control and will power here to not eat the whole mixture out of the bowl with your fingers...or a spoon. It is that good!] When this is ready, place 1 tablespoon into each tartlet shell.
 Mmmm.... looks divine! The recipe should make 24 total.
 I topped each of mine with a small dollop of homemade whipped cream. Delicious!
70 calories each makes for a very light and creamy summertime dessert.

Enjoy!
Mary