Monday, April 23, 2012

Easy Oven-Baked Fries

Seriously, who doesn't love fries?? I love them even when they're not technically fried. :)
Let's not waste any time with chit chat today - it's time to dive into the fries!

Grab some russet baked potatoes - scrub them clean, cut in half lengthwise, and then cut into thin slices. Adjust the size and thickness based on your own preference.

Take your baking sheet and cover with foil - spray with nonstick baking spray. Place the potato slices on the sheet, drizzle with 1-2 teaspoons of olive oil. Now comes the seasoning - get creative! Seriously, whatever you want! This time I did salt, pepper, garlic powder, paprika and rosemary. You can keep it simple with just salt. You can make them spicy. You can add cajun seasoning, or make garlic fries. Do whatever sounds good to you and your family!

Place in the oven at 400 degrees until browned. This takes 30-40 mintues...move them around on the baking sheet about halfway through the cooking process so that they brown easily.
They'll come out browned and flavorful. Enjoy as a side to your favorite dish!
Mary

Low Calorie Chocolate Chip Muffins

We wanted some more breakfast options for my husband and decided to do some research. He likes muffins, but muffins from the store are often very high in calories and sugar count. Did some searching online and it seemed almost too good to be true when I found a muffin recipethat boasted 263 calories for a jumbo muffin (which equates to 131 calories for a standard muffin - in a 12 hole muffin pan). Guess what, it tasted awesome, too! My husband and I (are a few lucky friends who were over when they came out of the oven) loved them.

No pictures of the baking process, but I'll walk you through it:

Preheat the oven to 400 degress and spray a 6 cup jumbo (or 12 cup standard) muffin tin with cooking spray - or use paper liners.

Combine the following in a large bowl: 1 1/3 cup whole wheat flour, 2/3 cup all-purpose flour, 1 teaspoon baking power, 1/2 teaspoon baking soda, 1 teaspoon salt. In a separate bowl, (I used my kitchenaid) whisk together 1 whole egg plus 1 additional egg white, 1 cup light vanilla yogurt, 2 tablespoons canola oil, 1/2 cup skim milk, 1/3 cup light brown sugar, and 2 teaspoons vanilla.

Add the dry ingredients to the wet until everything is just combined. Fold in 3/4 cup of chocolate chips.

Spoon the batter into the muffin cups, filling them 2/3 full. Bake for 20-25 minutes or until gold brown. Stick a toothpick or a fork in the middle to make sure they're cooked all the way through. Let the muffins cool a bit, remove from the muffin pan and enjoy!

They were so delicious and the vanilla yogurt adds a nice flavor and moistness to the muffin.

Complete nutrition info for 12 standard muffins - Per muffin: 131.5 calories, 2 g fat, 31 g carb, 5g fiber, 4g sugar.

Enjoy these muffins for breakfast, dessert or a snack! I actually made a second batch without chocolate chips that I served with some all-fruit jelly.

Mary

Orange Julius anyone??

I always loved when we would make orange julius' for treats when I was growing up. They're so refreshing and tasty! However, they're not exactly a great option when it comes to calorie/sugar content. When we got our VitaMix, it came with a recipe book that I put on the bookshelf and hadn't really thought of since. I decided to pull it out this morning, and it is absolutely a treasure trove of great recipes! I was so excited to see one called 'Orange Juice Plus'. It tastes just like an orange julius, and the best part is there are only 42 calories per cup!

To make it, place the following ingredients into your blender in the order listed:
2 medium navel oranges - peeled and halved ~ 1/4 cup water ~ 1/4 teaspoon vanilla
1 tablespoon sugar ~ 3/4 cup ice

Turn your blender on and blend for 30 seconds or until desired consistency is reached. It makes 3 cups total - I gave my hubby 2 cups at 84 calories total, and I had 1 cup. It was delicious and refreshing!


Enjoy this warm weather treat guilt-free!
Mary

Tuesday, April 17, 2012

What's for Lunch today??

I was recently referred to the website skinnytaste.com . I want to say outright that I am NOT a supporter of gluten-free/low-carb at all (unless someone has a gluten intolerance/allergy). I do not agree with the Paleo diet. I (and my mom and I are on the same page on this!) think that whole grains are very essential in your diet. Eliminate carbs made from white flour and cut out processed sugars from your diet. If you take bad carbs out of the picture, what you're left with are a source of nutrition that provides a lot of energy for your body. Not to mention the fiber benefits found in whole grains. Anyways! - this website promotes a lot of gluten-free things, because that is the big fad diet right now. So, moral of this long winded paragraph, take the recipes with a grain of salt. And remember, 'good' carbs are good!!!

So the point of bringing up this website, is that I found a recipe for 'Zesty Avocado Cilantro Buttermilk Dressing'. This sounded awesome, and since I was planning on making a big salad for lunch, this seemed like the perfect topping.

The ingredients in this recipe are:
  • 3/4 cup low-fat buttermilk
  • 1 small jalapeno
  • 1/4 cup of fresh cilantro
  • 1 medium haas avocado
  • 1 clove garlic
  • 2 tbsp chopped scallion
  • juice of 1 lime
  • 1/8 tsp cumin
  • 1/4 tsp fresh ground pepper
  • 1/2 tsp kosher salt

And get this, the website provided nutrition info! I love that!
Servings: 6 • Serving Size: 3 1/2 tbsp Calories: 64.9 • Fat: 4.8 g • Protein: 1.8 g • Carb: 5.1 g • Fiber: 2.2 g • Sugar: 1.9 Sodium: 128.8 mg

A side note is that I found this recipe when I had just gotten back from the store, so I didn't have scallions or cilantro (which are actually usually staples for me!). So my version is a smidge different. Let's go!

Did you know that if you don't have buttermilk, you can simply squeeze a lemon into some milk and let it sit for a few minutes? I love this trick. The acid in the lemon makes the milk curdle, and voila! you've got buttermilk. So measure 3/4 cup. (I use 1% milk. The fat found in milk can only be found here and there are benefits to - no need to go fat free, and at the same time, don't overdo it with whole milk).
Take your avocado, split in half and take out the pit. Place in your food processor or blender.
Next, I added in my salt, pepper and cumin. Oh, and two cloves of garlic! The recipe called for one, but I love garlic.
Squeeze the lime juice right in!
Slice the top off of your jalapeno, and then cut it in half. If you are sensitive to heat, cut out the membranes and seeds. Chop into rough pieces, and throw in the food processor.
Place your buttermilk in the food processor. [Add half of the milk to start, if you want your dressing thinner, add more until you reach the desired consistency!] At this point, you would add the cilantro and scallions.

Alright, taste your dressing. Add more seasoning if needed. Add some more of the milk if you want it thinner. Make it perfect for you!

Let's plate it up....
I took a plate and heaped on a bunch of salad. I took a can of tuna and used about half of it. All I did was scatter it around the plate. Then I took some cherry tomatoes, cut them in half and added them to the salad. Finally, use a spoon (remember the nutrition info is based on 3.5 tablespoons per serving!) and place some dressing on your salad. You won't need all of the dressing you made for your one salad!

Now remember, carbs are good. I would serve this with a nice slice of whole grain bread or some whole wheat pita chips!
Want to fancy up your drink to go with your lunch? I got this drink in part from two wonderful women in my life... my mom combines her sparkling water with slices of fruit. And our dear friend Kari T helped me realize that you don't have to reserve your wine glasses for alcoholic beverages. It adds a touch of elegance to any drink! :)Enjoy your eats today!
Mary

Friday, April 6, 2012

Homemade Ribs

I have recently developed a love for ribs. The South is famous for it's BBQ....on every corner there is another BBQ place claiming to be the best bbq in the south! Unfortunately, with my food "issues" (aka not eating preservatives and chemicals and flavor enhancers) these places aren't really an option for me. That left me with only one option - to make it myself! There are a lot of options at BBQ places.... but ribs are definitely my favorite, so let me show you how I make mine.

The most important part of making ribs is having good seasoning. Some people do only a dry rub, some people do only sauce, and some people do a combo. I change it up between dry rub only and a combo. But let's get to the dry rub and go from there....

This is the base for flavor in your ribs, so go BOLD! I have to apologize here because I have never measured the dry rub when I make it. Part of what I love about cooking is that you don't have to be exact. You can throw a little of this in, and a little more of that, and get it to the perfect flavor palette for you. My rub includes a combo of salt and pepper (of course!), paprika (that's the big red pile), a little cayenne powder (the small red), garlic powder and onion powder. I combine all of that together...
and get some brown sugar! The brown sugar is what will help the outside of the ribs to carmelize as it cooks. I just mix the spice rub in with about 1-2 cups of brown sugar. Remember though, it's flexible - so don't get too worked up about it. Add some, think you need more? Add a little more!
This foil process was perfected by my mom, and it works really well! Lay down one piece of foil on the counter, and get another piece ready to lay on top of the ribs once you rub the spice/sugar mix on.
Lay the ribs meaty side down on the foil. Speaking of the ribs, I usually buy pork loin ribs because they're tasty....and they're cheap! I can get them for about $1.91/lb. Baby back ribs are delicious, but they are usually closer to $4+/lb. Anyways, spoon some of the spice mix over the top and rub it in - it's not called a dry rub for nothing.... get rubbing!
Then flip it over. This is the side where I reserve most of the rub for....because it is where most of the meat is, and we want to give it a lot of yummy flavor.
Now, wash your hands! Then, lay the top piece of foil over the bottom. I'm sorry that I don't have any good pictures of this process. But you will push the two pieces together, and then roll the bottom piece over the top until you run out of room (because you're up against the rib) and fold down. Make sure it is well-sealed! If it's not, you will have the rib juices dripping out.
Line a baking sheet with foil, and place your foil wrapped ribs on top. Place in the oven at 300 degrees for 3-4 hours. For the last 15-30 minutes, I unwrap the foil (just the top piece) and place a little more brown sugar over the top to carmelize. This is also the point where I would rub on some barbeque sauce (by the way, Trader Joe's has an awesome and natural sauce!). I would put the sauce and then sprinkle a little brown sugar over.
You know the ribs are ready when they are fork tender. Basically, take a fork and try and "fork off" a piece of the ribs that are near you. It should pull off easily.

And this is what they'll look like what they're done. This was a set of ribs we made for a party we had - 5 racks of ribs....my idea of a party! :)
Hope I've taken some of the fear factor out of ribs for you! I used to be pretty intimidated by them, but they are so easy. The prep part takes 10-15 minutes, and then you let them go for a few hours! They end up so tasty. We serve them with mashed potatoes or homemade fries....salad, corn....whatever you feel like!

Mary

Thursday, April 5, 2012

Potato Leek Soup

Can't believe it has been so long since I posted! I'm so sorry! Like my mom has said in the past... even though there hasn't been an update, I've still been eating healthy and exercising. I got a new job that has kept me very busy (and very tired on my days off!!). Things are going well there, and I have a whole bunch of photos saved of food I've been preparing.

Today, I wanted to share some potato & leek soup. I first made this at Thanksgiving time. My hubs and my sisters in law really enjoyed the soup. Trav has even asked for the soup again a few times, so I knew it was time to make it again. It's a pretty easy thing to do, and soo very tasty.

Let's get started. I wonder how many of you could find a leek in a grocery store. For those of you who don't think you could, this is a leek. The darker green leafs get discarded. Begin by cutting the end off of the leek.
Then, cut it in half lengthwise.
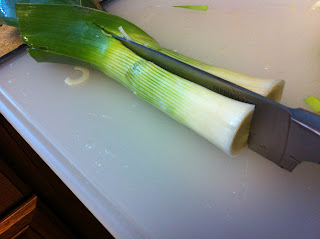
Leeks are sort of infamous for having sand and grit inside them. Be very thorough when washing the leeks, and make sure that you get all of the sand out - that is not something you want to find in your food! Take one half at a time and rinse under cold water, separate the 'leaves' and give them a good washing! (I'm not sure if they're technically called leaves.....)
Place the cleaned leeks on the cutting board and start chopping. You want to chop all of the white and light green areas. Discard the darker parts. I used 3 leeks total for this recipe!
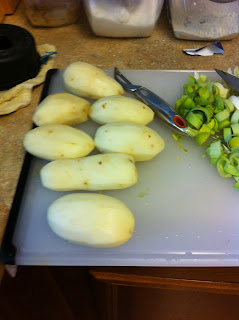
Next, get 2 pounds of potatoes and wash and peel them.
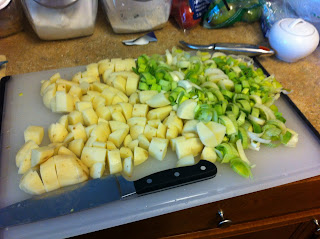
Chop up your peeled potatoes so they are equal in size.
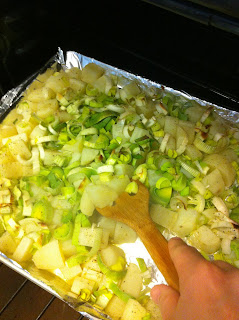
Get a baking sheet and wrap in foil and spray with nonstick cooking spray. Place the potatoes and leeks on the baking sheet in a single layer. And like anything that I roast, I added a drizzle of olive oil and a sprinkle of salt and pepper. That is the secret for excellent taste in roasted food. Place in the oven at 400 degrees for 45 minutes.
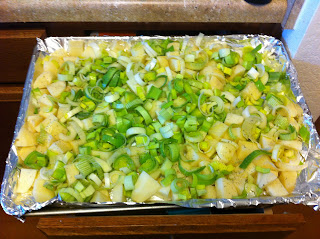
About halfway through the cooking time, open the oven and move things around so they cook evenly.
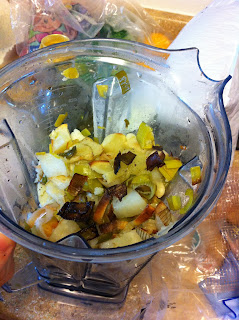
When things are done, carefully transfer the roasted potatoes and leeks to a food processor, blender or your trusty VitaMix. :) Before you transfer, you can add a few handfuls of arugula and let it roast until wilted, 4-5 minutes. My hubby would not eat a soup with arugula in it, so I skipped that part, but how delicious does that sound??
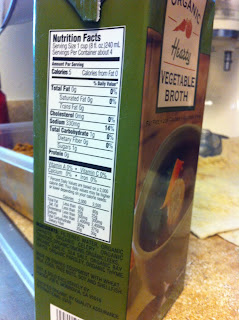
You can use chicken stock, but I haven't found a chemical/preservative free chicken broth or stock in a store that I like, so I used Trader Joe's vegetable broth.
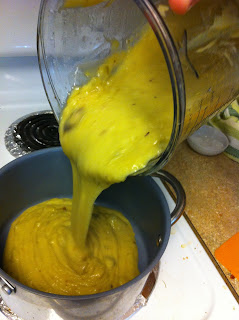
Pour a good amount of the broth in - I'm not exactly sure how many cups I used. I'm sorry, I should have measured! But probably 5 cups or so. Just keep adding the liquid until the ingredients are combined. You can also add a splash of white wine if you're feeling sassy.
Pour the blended mixture into a medium pot.
At this point, I added a little more broth to thin the soup out. Then I tasted - delicious! - and added a little more salt and pepper. I had a little cream left over from some homemade whipped cream I made so I added a little splash of that just to add a really rich note. You can absolutely skip this part - and if you want another option, you can put a little butter in, or do without all together.

This soup tastes wonderful and filling - and if you leave out the butter/cream, is really a very good option. Hope you enjoy!

Mary