Saturday, September 17, 2011

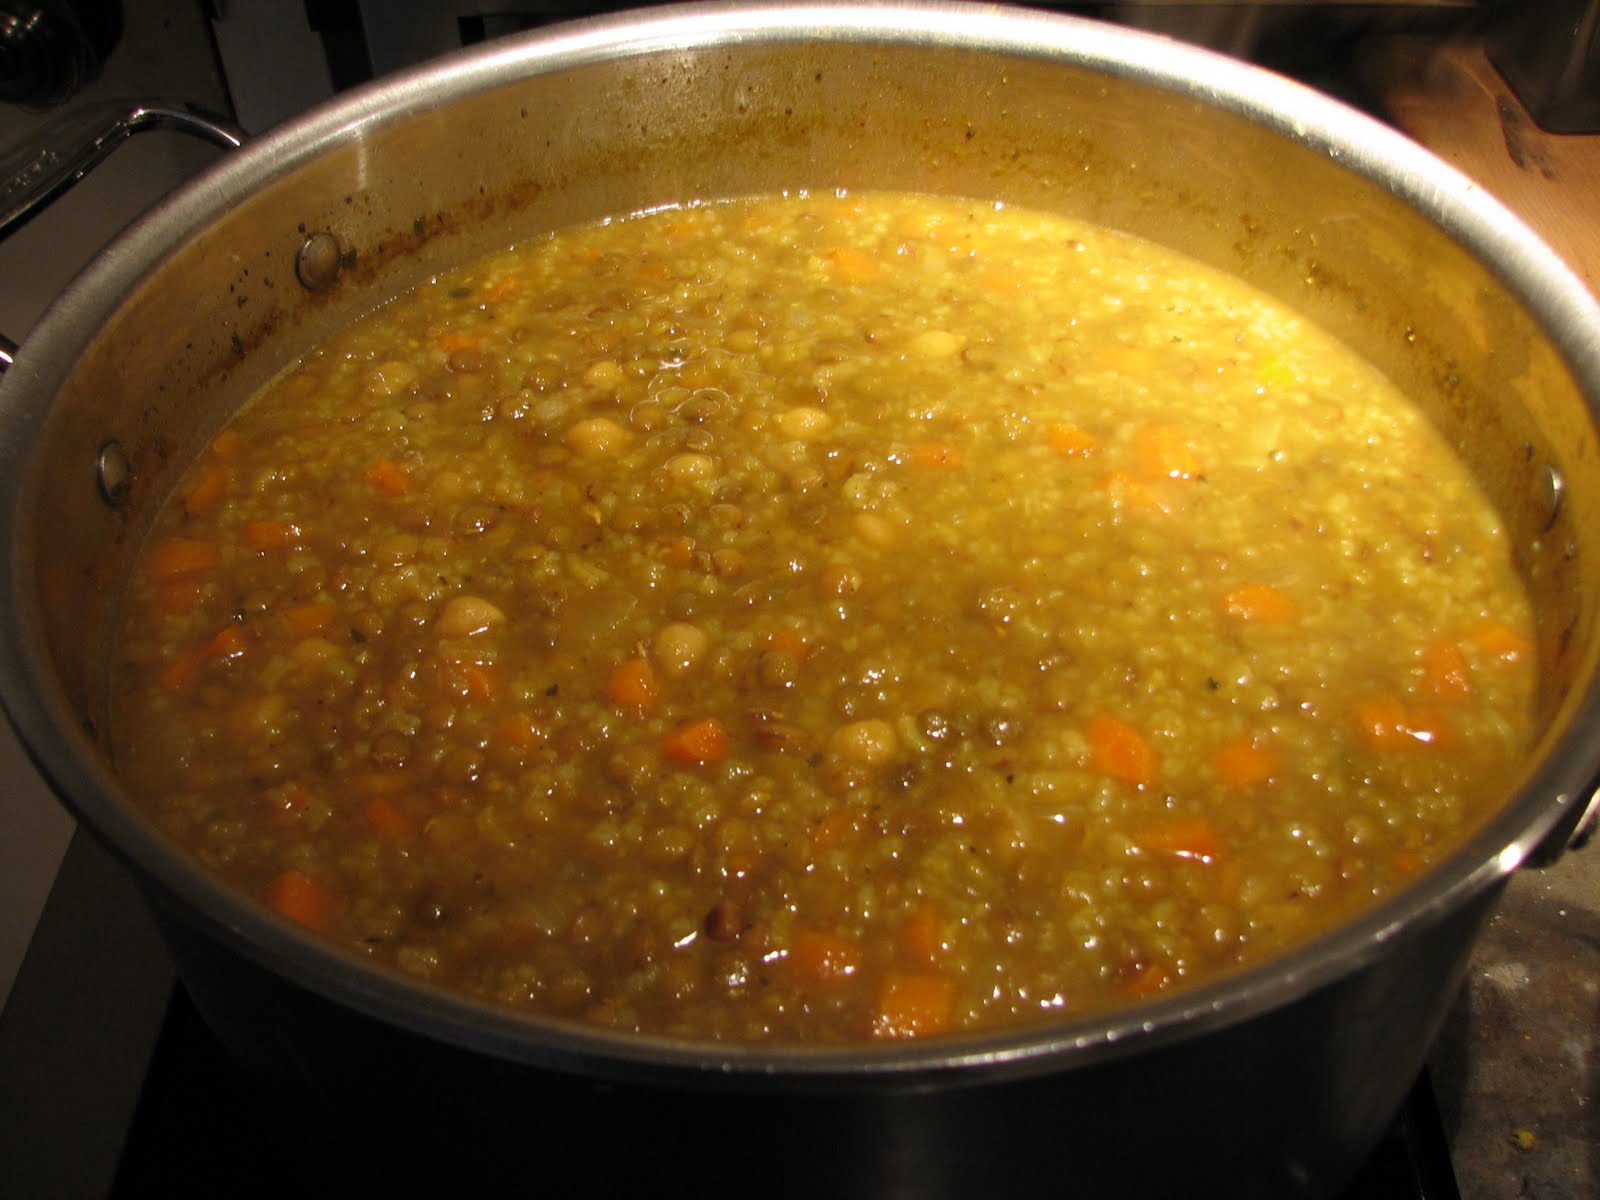
Middle Eastern Lentil Chick Pea Soup


My girlfriend Sallie used to live just steps from a small family owned Middle Eastern takeout restaurant in Astoria, Queens. For months we were regulars because of the high quality, tasty, and spicy plates and sides. We loved the food because the spices packed a punch. Not quite in terms of heat, though we always maxed out the hot sauce addition, but the earthy spices like cumin, coriander, turmeric. What I was inspired to make most was the Lentil Chickpea Soup. It’s a soup that we both craved after temps in the 90˚s. If you can eat hot soup when it’s hot outside it must be good.

The soup is fairly easy to make, but it takes time. You could conceivably eat after cooking for an hour, though if you let it simmer for 3, 4, or 5 hours and let cool it’s spices will meld together so wonderfully.

This recipe makes 2-3 meals. I freeze in portions for later use. Recipe can easily be halved for a single meal.


Ingredients:

10 Cups of Water *

Tablespoon of “Better than Bouillon Vegetable Base”

2 Cups of diced Carrots

3/4 Cup of diced Red Onion

1 Cup of Medium Grain White Rice

1 LB. Lentils

1 Cup dried Chickpeas (soak over night)

3 pieces of garlic diced

Spices:

½ -1 teaspoon ground Pepper

½ -1 teaspoon Curry Powder

1 teaspoon Cayenne Pepper

1 teaspoon Turmeric

1 teaspoon Ground Coriander

1 teaspoon Ground Cumin


In an 8 quart stock pot sauté diced garlic, carrots and onions in a tablespoon of olive oil. Remove as much of Garlic/Carrots/Onions as possible and reserve for later.


Place Water, lentils, rice, vegetable base and bring to boil. Boil for 5 minutes and reduce to simmer.


After about 45 minutes on Simmer add the reserved Garlic/Carrots/Onions, Chickpeas and spices. At this time the rice and lentils will have somewhat dissolved.


Simmer for another 30 minutes to allow flavors to meld. If soup is too thick for your taste then just add some water and cook for a few more minutes.

I simmer the soup down to a somewhat pasty constancy, which is an additional

1-2 hours. Until it looks like the picture above.


Serve in soup dish with splash of olive oil, hot sauce, dash of oregano, and toasted pita.


Friday, September 16, 2011

Carnitas

Here are some pictures that I took early this year when I was living in Indiana still. It's a great, easy recipe...figured since I already had the pictures I might as well share them with you! :)

Carnitas are delicious and really quite easy. You purchase a pork butt roast, brown it, and stick it in a crock pot all day and wait for magic to occur! Let me walk you through it...


Buy your meat. Season liberally on all sides with salt and pepper.

Heat up your skillet/pan. The hotter the better. We are looking to brown the meat as quickly as possible. We are not trying to cook the meat through - that's what the crock pot is for!

Place your well-seasoned meat in the pan. If you don't hear intense sizzling as soon as the meat makes contact, it's not hot enough.

Brown the meat on all sides. Mmmm. Resist the urge to pick off a particularly well-browned piece!

Transfer your meat to the waiting crock pot. Add in one bottle of beer. Whatever you prefer. Seems to me like a mexican beer lends itself rather well to carnitas...but really, whatever you have on hand will work perfectly. For those of you concerned about alcohol, all of the alcohol will cook out over the long cooking process. Then you're left with just the wonderful flavor from the beer.

Put the lid on. Set the crock pot to low. Now walk away. Seriously. For 6-8 hours. Go to work. Get a manicure. Get a haircut. Wrap Christmas presents if you're organized like that.

Now that 8 glorious hours have passed....remove the lid. Be sure not to take off the lid earlier than this to get a sneak peak. The built up steam inside of the crock pot is what helps the cooking process. Everytime this escapes you need to add on an extra 30 minutes of cooktime. Just wait, trust me!

Stick a fork in the meat...

And it should just fall off the bone.....and perhaps, directly into your mouth. You do need to be sure its safe for others to eat before serving, right?

This makes an easy weeknight meal. Hard to beat a 4 ingredient main course. Also, works really well for parties, because you just double the amount of meat and add in another bottle of beer. Easy math. Shred the meat and place in tacos. Carnitas burritos? Yum. Tostada with beans, carnitas, lettuce, tomatoes, avocado...mmm.

Enjoy!
Mary


Thursday, September 15, 2011

Jalapeno Poppers with a Twist!


Our backyard garden has been doing really well this summer. One of the crops that we have had an abundance of is jalapenos. We love spicy food so we had no problem adding jalapenos to salsa and some of our other favorite recipes. However, we had so many that my mom and I just knew that we needed to find a dish where the jalapenos could be the star.

Enter jalapeno poppers.

These aren't just any jalapeno poppers, though. The primary difference is they are not overflowing with cheese or fried.

Let's take a look at how these were made.
Grab a bunch of jalapenos and cut them in half. I think that I used 12 jalapenos, giving me 24 halves.


The hottest parts of the jalapeno are the seeds and the white membrane inside. Use a spoon and scrape this out. If you're feeling wimpy, you can put gloves on. If you're brave and use no gloves, just make sure to aggressively wash your hands before you even think of touching your eyes. Trust me on this one.

Here's a shot in the middle of the de-seeding process.


When I was making this I should have taken more pictures, but I was hungry and excited and got a little distracted. Turn your BBQ on to heat up. While it is heating, grab some goat cheese and prosciutto. Take a spoonful of goat cheese and place it inside the jalapeno half. Then, take a slice of prosciutto and wrap it around the goat cheese stuffed jala-jala-peno. Use can use a toothpick to secure. I did on some, but then got tired of the extra step.

Continue with all of your halves. You can do all the cheese, then all of the prosciutto, or you can go cheese, meat, cheese, meat. Whatever makes you happy!

Place these little babies on the grill, cheese side up. Let them brown and carmelize a little bit. Flip over for about a minute. You don't want your cheese to melt right out of the half.

Finished product:
Verdict: Yum. Double yum.

The creamy goat cheese and the salty (nitrate-free) meat really balance well with the heat from the pepper. If (and when) I make this again, I will use a little bit less goat cheese. Maybe 1-2 teaspoons per half.

Remember, people - moderation for life. It's okay to have a goat cheese-filled, meat-wrapped jalapeno every once in a while. And you can afford to have a few if it's grilled and not fried! :)

Mary

Wednesday, September 7, 2011

Chimichurri

The best description that I have ever heard in regards to Chimichurri sauce was that the steak it was placed on tasted like it had been dragged through the garden. That's exactly what the sauce is....a garden medley of herbs that come together to make a fresh and fabulous topping for a nice grilled steak.

The recipe that I used is as follows:

1 bunch flat leaf parsley
8 cloves minced garlic
3/4 cup extra virgin olive oil [you don't need this much!! add a little, and add more if its needed]
1/4 cup red wine vinegar
juice of 1 lemon wedge
1 tablespoon diced red onion
1 teaspoon dried oregano
1 teaspoon black pepper
1/2 teaspoon salt

Pulse parsley in processor to chop.
Add remaining ingredients and blend.
Separate sauce into equal parts.

Use half of the sauce for basting, and use the other half for table service.

Grab yourself a tri tip roast...mmm!

Follow the recipe and make up your chimichurri...

Smear it all over your tri tip roast.

Throw it on the grill. You want to do about 20 minutes on each side...slow and low is the key here. If you want to get fancy, once the first side has been down for a few minutes (5 or so), turn the piece (with the same side down) and rotate it 90 degrees and cook for another 5 minutes...this will give the cross hatch marks.
After 10 minutes, flip the meat. 5 minutes into this side turn 90 degrees again. Make sure you check for doneness... although this cut of meat thrives at medium, so don't be scared to take it off a little earlier than you usually would!

Here's the finished product:

Serve with some more chimichurri on top and enjoy!! And guess what, this makes fabulous leftovers the next day... I took a few of the slices and stuck them on the grill to warm them up. Topped with chimichurri, a few slices of home grown tomatoes, and a side of homemade guacamole. I have to say it might have been better the second day!!!

Make the most of the last days of summer and grill some tri tip this weekend!
Mary


Monday, September 5, 2011

Pizza on the BBQ

One of the things that I missed most while I was living in Indiana was being able to barbeque outside... I absolutely love grilling, it is one of the quintessential summer activities for me. What's great about southern CA is that this awesome cooking option can be done year round! We have grilled several times a week throughout August, and decided to grill pizza out on the bbq. We did this once before with cousin David on a trip to Aruba last summer and it was great!

We bought whole wheat pizza dough from Trader Joe's - it is in the refrigerated section. You can also call up your local pizza store and ask if they sell dough...many do. Bring the dough home, flour a surface, and roll out your dough. Sometimes we do one piece with all of the dough, other times we divide it into 1/4s for more of a single serve pizza feel. Whatever you prefer! If you have the equipment, grab your pizza peel. This is an instrument that allows the pizza to slide right off of it and into the oven or onto the grill. We placed some cornmeal on it before placing the rolled out dough to prevent sticking.

Put oil on a paper towel and rub it on the grill slats. Slide your pizza on to the grill - medium heat.

Allow the 'down' side to firm up, and even brown a little. When this happens, flip it over and get your toppings ready! You can add anything you want....traditional cheese, pepperoni, veggie, bbq chicken, thai pizza, etc! Go crazy and get creative. The bottom of the crust will cook and brown as the cheese and toppings on top warm and start to melt. Check both sides of the pizza to know when it's time to remove it.

Grab your pizza peel and gently slide it underneath the surface of the pizza and remove it from the grill once the bottom is lightly browned and the cheese is melted on top. Yum!


Use your pizza peel to slide the pizza onto the cutting board. Grab your pizza cutter and slice up. We often times will top the finished pizza with a bunch of arugula and a sprinkling of red pepper flakes. Enjoy :)


For you pizza lovers, this is a great option to take out or chain pizza. Nothing against them at all, but with homemade pizza you control exactly what is going into your body.

Just to show you all that this blog is named moderation for life, for a very good reason... here's a picture of a homemade dessert that I baked and thoroughly enjoyed eating! Moderation is the key - I don't eat sweets like this every day, but when I do, I am not afraid to indulge and enjoy.
Can't believe Labor Day has come and gone...2011 is flying by!
Mary

Sunday, September 4, 2011

Been a little busy...

Yikes! Between moving home from Indiana and the rest of summer just zipping by...somehow it's been over a month since my last update!! So sorry to all of you for not keeping up with this. Mom and I are grateful to cousin David for providing a post in our absence. Hopefully the three of us will be much better at posting on a regular basis!

Will show you a few things that my mom and I have made since we've been reunited and able to cook together! :)

This is an AWESOME product from Costco.... Village Harvest's Whole Grain Creations. It has a medley of wheatberries, barley, quinoa, cranberries and almonds. You microwave 3/4 cup for 45 seconds and it's ready to eat!!
Here's the label: 220 calories in 3/4 cup, 4g of fat, 4g of fiber, and 5g of protein. Delish and a great option!

We made this grain, sauteed spinach with garlic, and added adobe shrimp to the plate. So yummy! For the shrimp, we combined adobo chilis with a little olive oil, salt and pepper. Tossed the shrimp in the sauce and cook in a pan.

We served this meal with a side of tomatoes, onions and green beans...marinated with a little bit of balsamic vinegar and red pepper flakes!


Will share one more picture for now....my mom and I went to the cafe in Nordstrom's for lunch one day in between the kids games at Junior Olympics this summer. I had a fabulous lunch...and I actually almost missed this item on the menu!! It was pan seared salmon with rustic roasted veggies. Olive oil, salt and pepper were the only seasonings used and it was wonderful. Loved the big pieces of veggies and the salmon was awesome...crispy outside from the pan being so hot, and cooked to perfection inside.


Hopefully once Derek and Alaina head back to school, I can convince my mom to rejoin the blogging world, I know you all miss her wonderful insights!

Mary

Sunday, August 14, 2011


Southwest Power Salad

Hello readers, my name is David. First cousin once removed from Gina. I spent lots of time cooking in the Cousineau household. Mary and I once had a cook off in which she was graciously named the winner. It was all for fun, but what's more serious is our shared passion for making and eating healthful foods. This is why I am honored to write for Do you have "Time" to eat that??

Over the years I have developed a passion for cooking. More recently I have been focusing on cooking healthful meals that have no processed ingredients. It may take a bit more time to prepare a meal all from scratch and people may enjoy the convenience of popping a preservative sodium laden prepared meal in the microwave. But, in no way is it convenient for your body. Just think of the amount of cases of type II diabetes, obesity, etc. It’s not difficult to correlate many illness and diseases to processed garbage foods…

At times when I do eat out, if a meal is tasty and healthful, I will in time try to clone the dish. Sometimes the clone is simple/easily reproduced and tastes better than the restaurant or take-out, other times it seems like an impossible objective. Though, it’s not similar in taste, it’s still makes a tasty, fresh, healthful meal. And, not to mention the cost savings.

My first clone is a southwest salad that my parents used to get at a local Staten Island Healthy Take-out joint. Emphasis on used to. It’s so easy to make this salad; little to no culinary experience is needed. It justifies not paying $10 a serving, when $10 can feed 4-5 adults.

This Salad has all the nutrients from fresh romaine, protein and fiber from black beans, taste and texture of corn, creaminess of fresh guacamole…

This is no side salad at your local Applebee’s. It’s a full meal. Packing 450-600 calories per serving. And, these calories are quality, nothing empty here! You are most justified adding a small amount of homemade ranch dressing. The ranch pairs so well with the guacamole. You’ll have plenty of time to eat this!!!
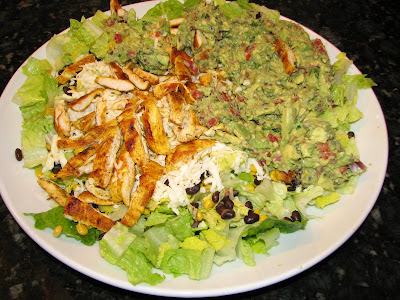


**These two pictures taken on two separate occasions have small variations, but they highlight different aspects of the salad. The first is a grilled chicken with just salt/pepper seasoning. The second is curry marinated chicken, which I prefer. The curry chicken adds a lot of spice and flavor.


Ingredients

1- Head of Romaine Lettuce

3- Chicken breasts(Marinade recipe below)

1.5 cup of Shredded Low moisture mozzarella

1.5 cup of Black Beans

1.5 cup of Frozen Corn

3 Avocados (Guacamole recipe below)

(Optional) Home Ranch Dressing (recipe below)

This makes approx. 4 servings, which equates to around 600 calories.


Note: When I begin to prepare this dish, I tend to separate the chicken preparation from the fresh raw salad ingredients. I’m always paranoid about getting food poisoning from the harmful microbes that proliferate in raw chicken.

--------------------------------------------------------------------------------


I start out about a two hours before dinnertime and marinate the chicken (recipe below) in zip lock bags and place in refrigerator. This can be done the night before, which will only intensify the taste of the chicken. Always a positive.

Close to dinnertime I mix up the guacamole and set aside. Next, I defrost the frozen corn. You can use drained canned corn(Disodium EDTA, leeched aluminum, sarcasm) but I feel that the frozen corn has a fresher taste and texture. The Black Beans must be soaked until soft. I usually allow the Beans to soak over night. But, this can be done over an hour as per package instructions. Also, it’s quicker just to crack open a can of Black Beans(defeated shrug), rinse and allow to dry slightly in strainer.

I cut the Lettuce in half length-wise, and then cut in into cubes. Wash and pat dry.

After drying, I place the lettuce in a large bowl and layer the salad ingredients making sure the mozzarella is on top. This is important because I like the slight melting that occurs when the hot chicken is placed on the cheese. Set it aside, clear of chicken prep.


The Chicken is the last step. I usually grill it to a 165˚ F. Let it sit for 5-10 minutes and slice in two length-wise then into short strips. Immediately place on top of salad. This meal for 4 would have cost around $40 from the Takeout place here on Staten Island. The salad’s ingredients would have feed 4 handsomely for about $3-$4 per person. Would have been less than $10 total if the prices of avocados weren’t obscenely priced. Either way that meal packs a healthful punch!


Guacamole

3 avocados

1/2 lime or lemon, juiced

1/2 teaspoon kosher salt

1/2 teaspoon ground cumin

1/2 teaspoon cayenne

1/2 medium red onion, diced

1 tablespoon chopped cilantro

1 clove garlic, minced


Half avocados and remove pit. Usually, I hit it gently with the blade of a knife so I sticks slightly into the pit, turn the knife in a circler motion to jar the pit and it will pop out. Then scoop the avocados out with a spoon and throw in a large bowl. Smash avocados with a fork until creamy. Then add all ingredients above, mix and set aside.


Chicken Marinade

1 teaspoon of curry powder

1 teaspoon of turmeric

½ teaspoon of garlic powder or 1 cube of frozen garlic paste

½ teaspoon of ground cayenne pepper

½ teaspoon of kosher salt

½ -1 cup of your favorite broth


In a small sauce pan pour broth and spices and put over medium heat. It should boil up rather quickly, stir and reduce to simmer. You want to reduce it slightly, if you want to thicken it up add half a teaspoon on corn starch and stir. Cool before mixing with chicken.


Homemade ranch

  • 1 cup mayonnaise
  • 1/2 cup sour cream
  • 1/2 teaspoon dried chives
  • 1/2 teaspoon dried parsley
  • 1/2 teaspoon dried dill weed
  • 1/4 teaspoon garlic powder
  • 1/4 teaspoon onion powder
  • 1/8 teaspoon salt

1/8 teaspoon ground black pepper

Mix all ingredients and set aside in refrigerator.